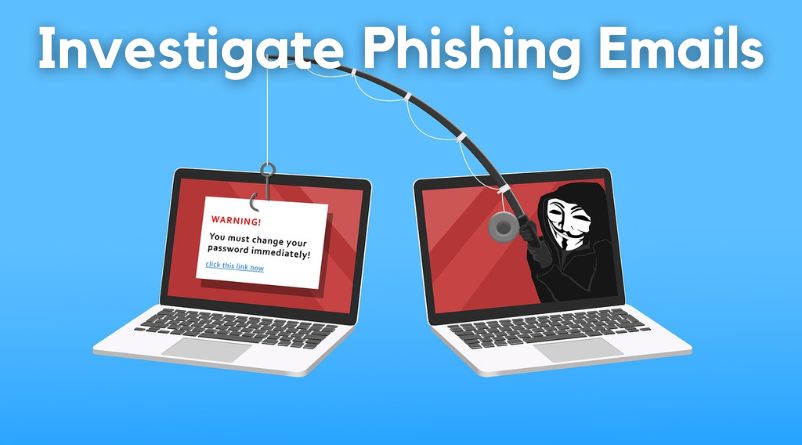
How to Investigate Phishing Emails
Introduction
Cybersecurity threats are becoming increasingly sophisticated and difficult to identify. Phishing is one of the most common forms of attack, with scammers using social engineering tactics to try and obtain sensitive information or financial gain from unsuspecting victims. While many organizations have implemented advanced security systems against these attacks, it’s important for businesses and individuals alike to be aware of threats in order to effectively protect themselves against them. In this blog post, we will in case of the phishing attack how to conduct a successful phishing investigation. We’ll look at some tools that can be used for conducting a successful investigation as well as best practices for mitigating risks going forward.
Blog Post will provide you a step-by-step guide
1.Collect Information
2.Analyze the Email Header
3.Check Email Attachments for Malware
4.Look for Red Flags
5.Determine the Target
6.Skills to defend against Phishing attacks
Let’s move to the first part and see how to collect Email Information. This includes mail header, email content, and any attachments or links.
Collect Information
Identify suspicious email address: Suspicious email addresses are those that appear to be from people or organizations that are unknown or untrustworthy. Common signs of a suspicious email address include containing misspelled words, using an unfamiliar domain name, or containing random numbers and letters. To identify these suspicious email addresses, we can take a number of steps.
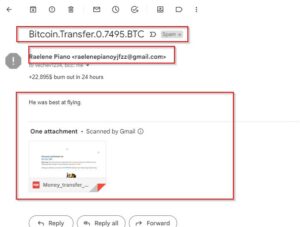
As you can see, the email appears suspicious. The sender’s name and email address do not appear genuine, and the subject matter which pertains to a Bitcoin transfer is also suspicious, as there is an attachment included in the body of the message. Let’s investigate further to uncover any additional information.
Analyze the Email Header
The structure of an email header is essential for successful communication between the sender and recipient. It provides important information which can help during the investigation in order to better understanding how Email Header is working please see below mentioned cheatsheet.
1.Return-Path: The email address to which bounces and other errors are sent.
2.Received: A list of servers that handled the message, including the sender’s domain, IP address, and authentication results.
3.Authentication-Results: A header that provides information about the sender’s domain and whether the message passed authentication checks, including DKIM and SPF.
4.DKIM-Signature: A header that provides information about the sender’s domain and a digital signature that verifies the message was not tampered with during transit.
5.From: The email address of the sender.
6.To: The email address of the recipient.
7.Cc: The email address(es) of additional recipients who received a copy of the email.
8.Bcc: The email address(es) of additional recipients who received a blind copy of the email.
9.Date: The date and time the email was sent.
10.Subject: The subject line of the email.
11.Message-ID: A unique identifier for the email message.
12.X-Mailer: The name of the software used to send the message.
13.Mime-Version: The version of the Multipurpose Internet Mail Extensions (MIME) standard used in the message.
14.Content-Type: The type of content included in the email (e.g., text, HTML, image).
15.Content-Transfer-Encoding: The encoding used to convert the message content from its original format to a format that can be sent over email.
16.X-Originating-IP: The IP address of the computer or device that sent the message.
17.X-MSFBL: Microsoft’s Feedback Loop header, which provides information about how the message was handled by Microsoft’s email services.
18.SPF: The Sender Policy Framework (SPF) record that identifies the authorized email servers for the sender’s domain.
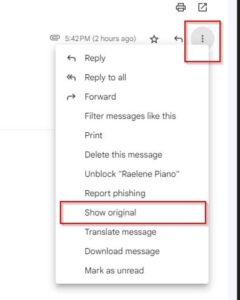
we can check email header in Gmail client using following function:
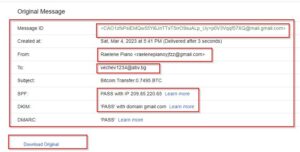
Download the email for further analysis.
Tools used During the Email header analysis:
1.Virtual Linux Machine
5.Simple Email Reputation Checker
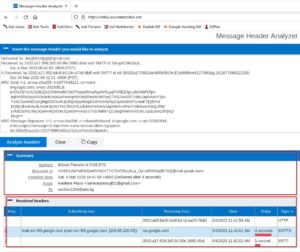
The next step is to open the extracted .eml file in any Linux text editor, copy the full text, and then open Microsoft Header Analysis. Paste the header text and you will see comparable results. In this step, you can use the above-mentioned Header cheatsheet to collect IOCs.
Check Email Attachments for Malware
At the beginning, we also notice that the email includes an attachment. Let’s extract the attached PDF file and investigate it.
To extract we will use tool emlAnalyzer. This will create a folder in the same directory with extracted PDF file once it is done, we can upload it Virustotal.
Command:

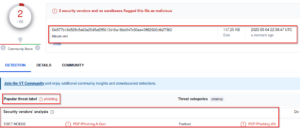
Virustotal Result.
Look for Red Flags
Simple Email reputation tool results Sender Email Address:

Determine the Target
In this case, scammers group specialized in crypto extortion are running a phishing campaign to steal crypto assets from people whose email addresses are appearing in breached crypto services databases.
Some quick tips to stay secure
1.Be wary of unsolicited emails: Do not click on links or download attachments in unsolicited emails, especially if they are from unknown senders.
2.Verify the sender: Double-check the email address and domain of the sender before clicking on any links or downloading attachments.
3.Look for spelling and grammar errors: Phishing emails often contain spelling and grammar errors or awkward phrasing.
4.Check for urgency or threats: Scammers may try to create a sense of urgency or use threats to pressure you into clicking on a link or providing sensitive information.
5.Hover over links: Before clicking on a link, hover over it to see where it leads. If the URL looks suspicious or doesn’t match the expected destination, do not click on it.
6.Keep your software updated: Make sure your operating system, web browser, and other software are up to date with the latest security patches.
7.Use anti-phishing tools: Some web browsers and email clients offer anti-phishing tools that can help detect and block phishing attempts.
8.Enable multi-factor authentication: Enable multi-factor authentication whenever possible to add an extra layer of security to your online accounts.
Also check: Don’t Fall for Phishing Attacks How to Identify and Avoid Them
Conclusion
Phishing attacks continue to be a significant threat to individuals and organizations, with scammers using increasingly sophisticated tactics to deceive their victims. However, by staying vigilant, following best practices, and using anti-phishing tools, individuals can protect themselves against these attacks. In the event of a suspected phishing attack, it is important to act quickly and report the incident to the appropriate authorities. By working together to prevent phishing attacks, we can help make the internet a safer place for everyone.